Published - 8 years ago ( Updated - 8 years ago )
This article will introduce the relevant instruction use cases step by step:
Model=>Factory=>Seeder=>DatabaseSeeder
Step by step, let us examine all the processes from the Model to the DatabaseSeeder.
Before you read this article, you should understand the use of make:migration in Laravel.
1. Model
Modify the database easily through simple ActiveRecord. Simply put, let us modify the data in the form of objects.
You can see the Active Record description here, and here is the RailsGuids article for your reference.
So how to build a Model in Laravel? Remember to use singular, an object Model Object represents a singular,
For example $obj->title instead of $objs->title.
Because there will be multiple data in the data table, the data table is plural in contents , which is very logical.
Of course, we can also customize the Table name corresponding to the Mode. For example, I added the following to the Content.php Model:
It is because this is an old program transferred to Laravel. This content table has existed for a long time and has been listed as a historic site by me. It cannot be moved.
Cannot rename to contents.
Therefore, Laravel's Model provides a high degree of freedom. Although there are preset rules, we can also adjust it according to our own situation and needs .
Such as the table name, or the PK field (id), etc. However, if you are a new project, please do not customize the name or PK of the Table arbitrarily!
There are special exceptions, which are not explained here.
Two, Factory (factory)
After Lravel 5.5, you can create different factories for different Models.
Let's take a look at the command first:
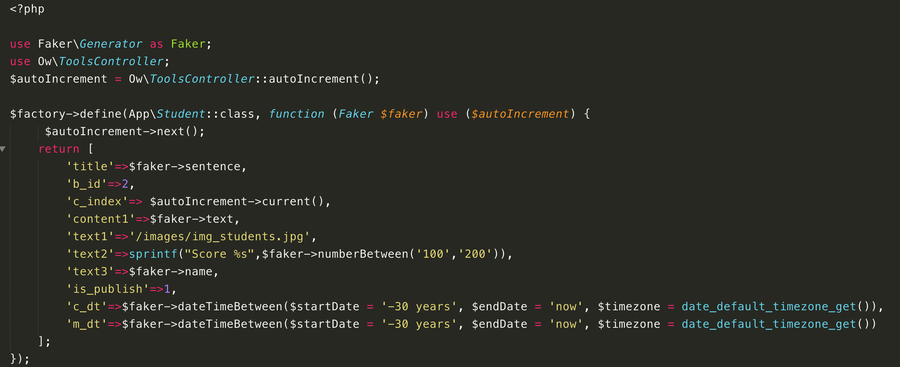
In the above instruction, in this factory ( StudentShareFactory ), I defined (define) an App\Student Model ,
And generate fake data through Faker , and store it in the field (below).
The sample below may be a bit more complex than the original Laravel preset, but basically once executed, a fake data will be created in the students data table,
Here I have an interesting way of using it. My c_index column needs to be added sequentially.
That is, when I create a hundred records, the c_index column must be added sequentially from 1 to 100, so I created a custom Class to handle this matter.
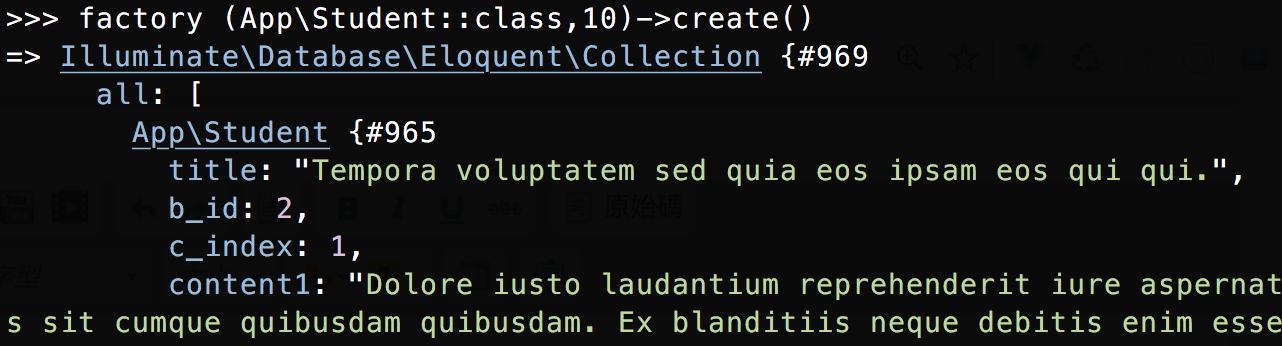
With Facetory, we can easily create single or multiple fake data through the instructions provided by Tinker (
In the picture below (Tinker's interactive mode), through the factory , I created 10 random fake data, and put them in the students data table.
3. Seeder
The use of Seeder allows us to create fake data without manually executing tinker .
How to build a seeder, I think, you may have guessed it, of course it is
I think after reading this, you should already know
And use
In the methods of run() in the figure below, add the factory instructions for creating fake data that I just used in Tinker,
For example, here, that is, when this run() is executed, 300 fake data can be created in one go.
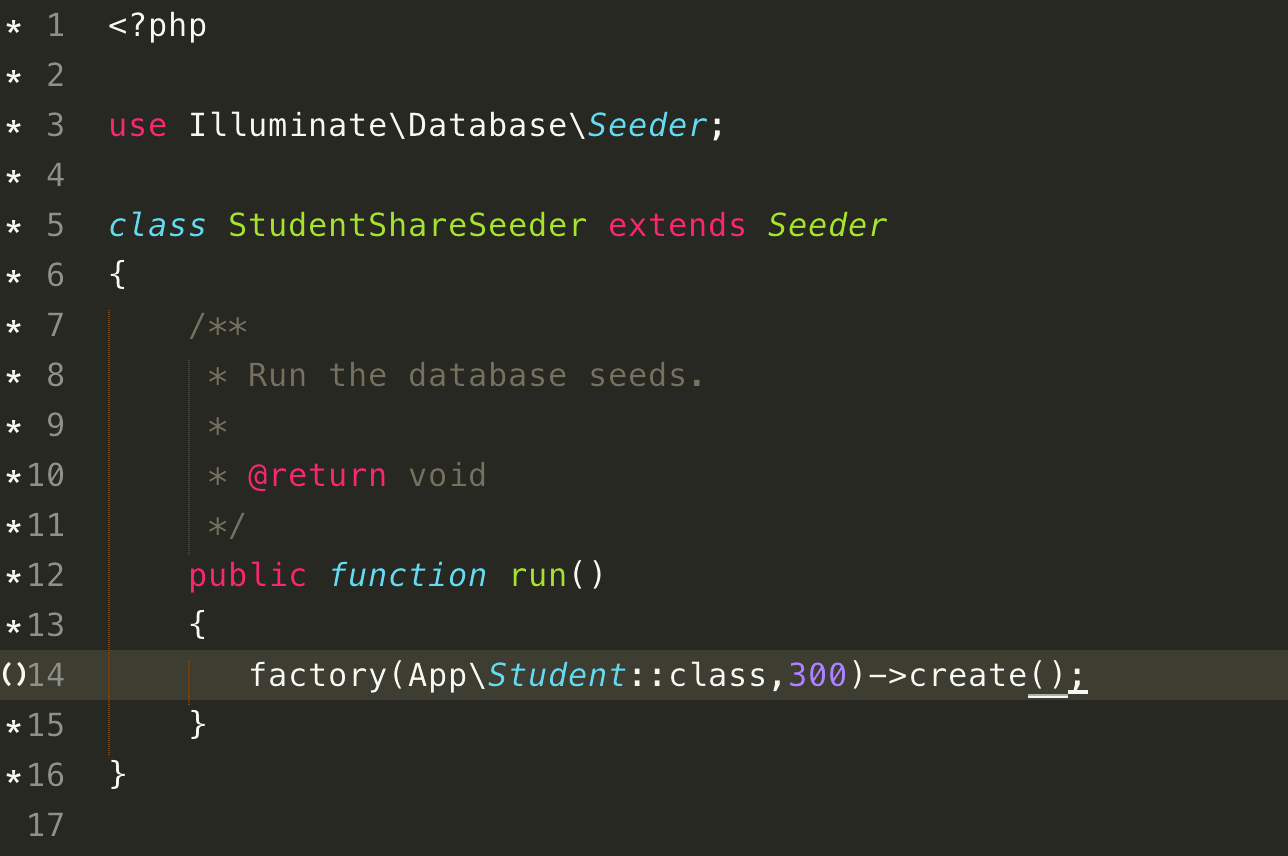
We can use the
For example, the StudentShareSeeder here can generate 300 pieces of fake information,
How can a new website be set up without fake information, right?
Note: The seeder can not only be used to generate fake data, but also can be used to generate the real data initially required by a project.
4. Database Seeder
To quickly establish an operational development environment, of course, you don't need to manually issue so many instructions, you should just use
When --class is not specified, DatabaseSeeder is used by default.
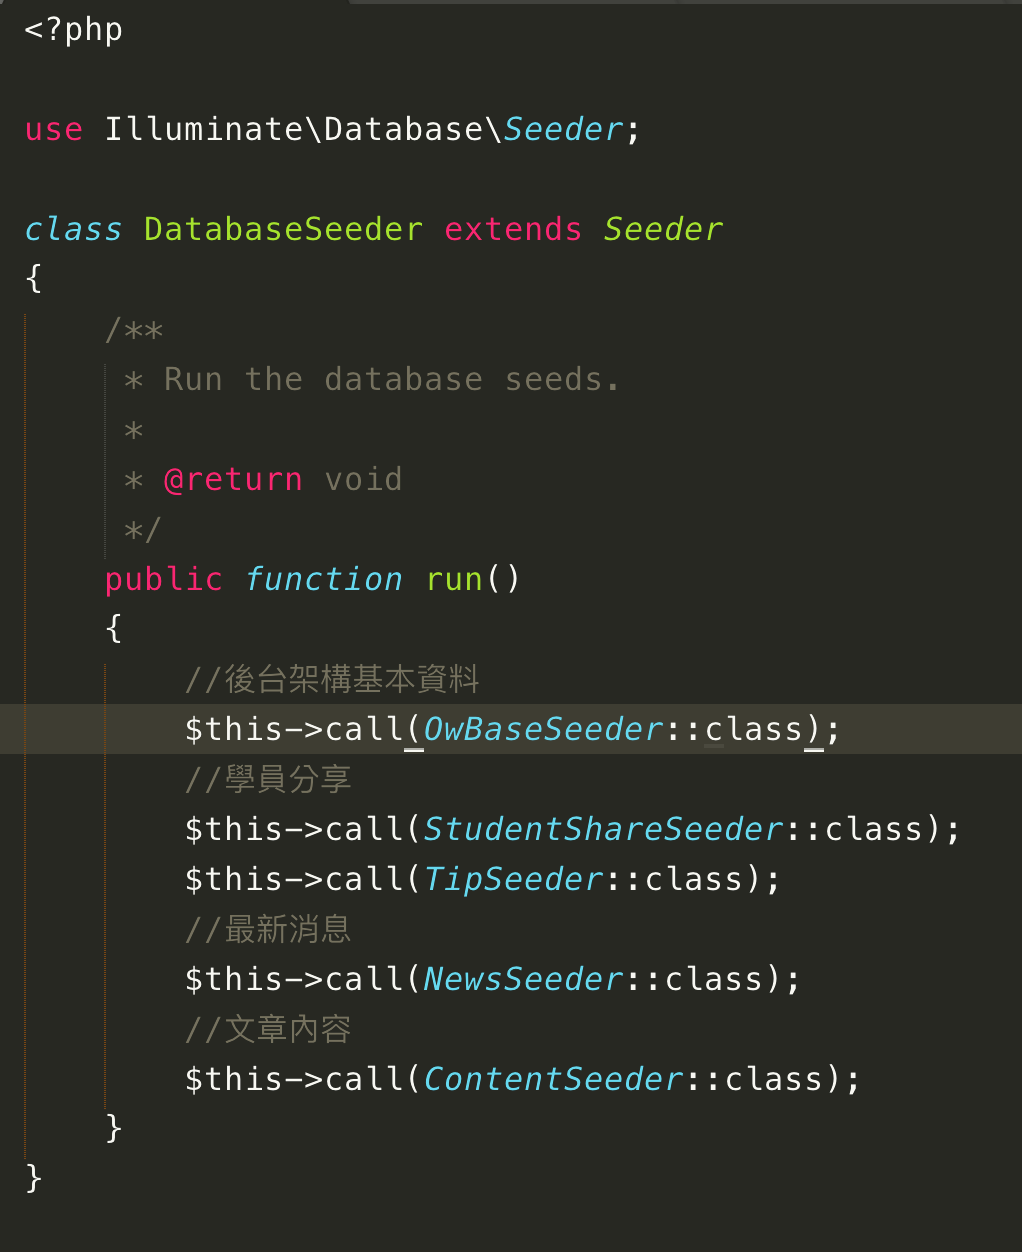
In the DatabaseSeeder.php in the figure below, you can see that I called a bunch of Seeders.
So for a reusable Project, I will execute migration and then execute
To generate the basic data required by the background.
Example: The background of my layout has fixed addition, modification and deletion functions and a modular form, so it is not necessary to build a website to rewrite the addition, modification and deletion once.
When I want to set up a new website, I just need to git clone the Project in the background.
Then execute
Then, according to the static page given to me by the artist, the front-end of the blade was set, so the background of the set can be reused.
Through
So with
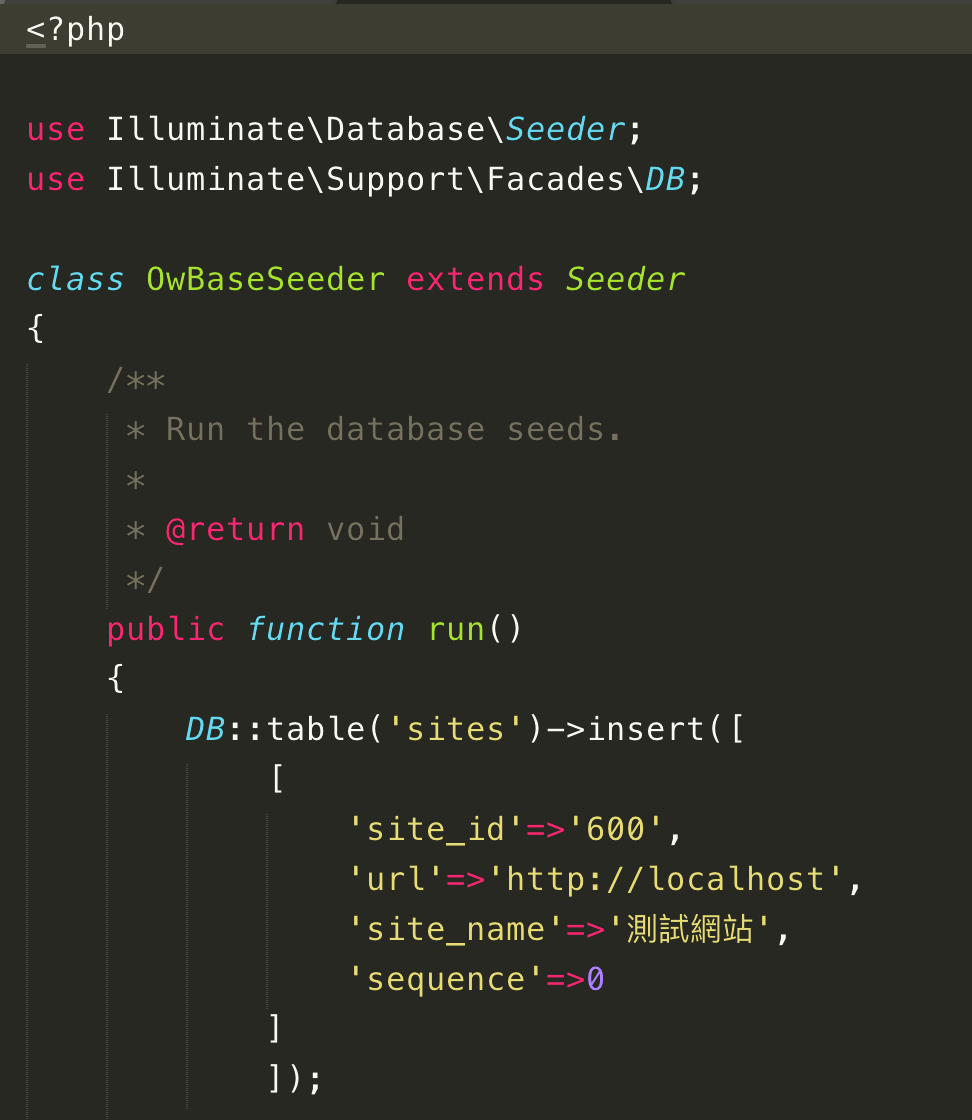
In the example above, my OwBaseSeeder is not running the factory , but Laravel 's Query Builder .
Take a look at my OwBaseSeeder.php here how to run Insert basic information.
Five, help (help)
Let's go back to Model. The make:model command has many useful parameters. Here we take Laravel 5.5 as an example.
-a or -m etc.
If we don't know much about Laravel's artisan command, if we want to know more, we can use the help keyword to get instructions.
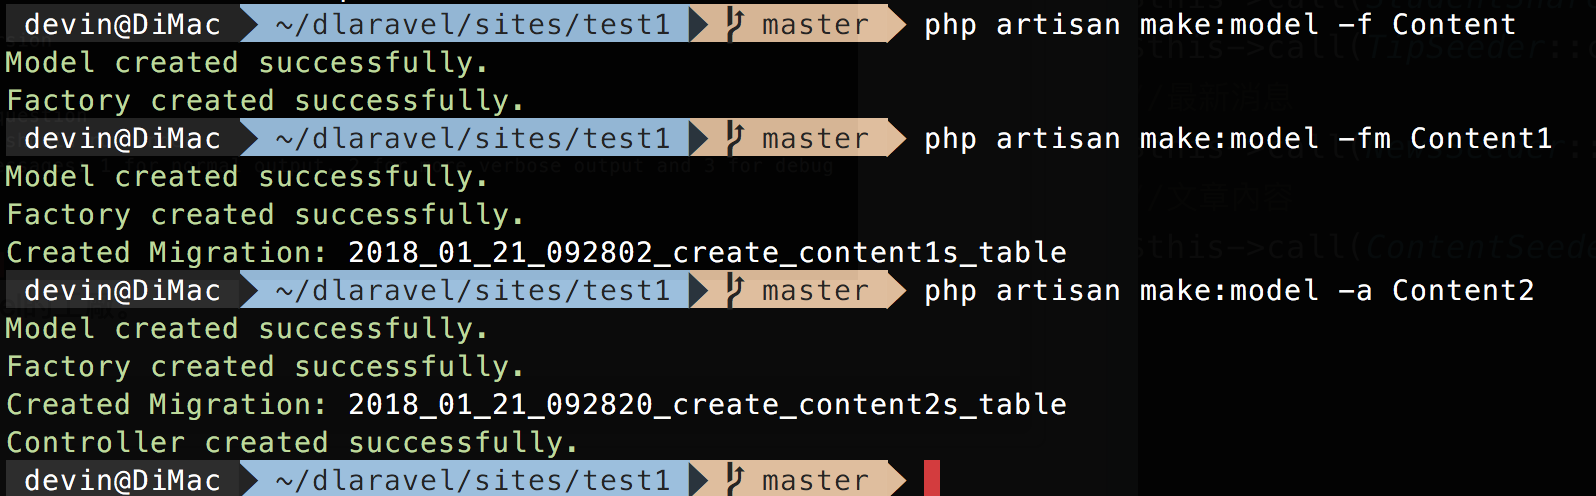
For example, while building the Model, other required files, such as Factory, Controller, and migration files, will be generated together.
Below, the diagram:
Model=>Factory=>Seeder=>DatabaseSeeder
Step by step, let us examine all the processes from the Model to the DatabaseSeeder.
Before you read this article, you should understand the use of make:migration in Laravel.
1. Model
Modify the database easily through simple ActiveRecord. Simply put, let us modify the data in the form of objects.
You can see the Active Record description here, and here is the RailsGuids article for your reference.
So how to build a Model in Laravel? Remember to use singular, an object Model Object represents a singular,
For example $obj->title instead of $objs->title.
php artisan make:model Content
The above command creates a model named Content, which is mapped to the contents data table in the data table by default.Because there will be multiple data in the data table, the data table is plural in contents , which is very logical.
Of course, we can also customize the Table name corresponding to the Mode. For example, I added the following to the Content.php Model:
protected $table='content';
The reason why I do this is definitely not because I am self-willed, nor is it because I am a dick or pretend to do so,It is because this is an old program transferred to Laravel. This content table has existed for a long time and has been listed as a historic site by me. It cannot be moved.
Cannot rename to contents.
Therefore, Laravel's Model provides a high degree of freedom. Although there are preset rules, we can also adjust it according to our own situation and needs .
Such as the table name, or the PK field (id), etc. However, if you are a new project, please do not customize the name or PK of the Table arbitrarily!
There are special exceptions, which are not explained here.
Two, Factory (factory)
After Lravel 5.5, you can create different factories for different Models.
Let's take a look at the command first:
php artisan make:factory StudentSahreFactory
In the above command, you can create a StudentShareFactory.php factory, which is usually used to create fake data.In the above instruction, in this factory ( StudentShareFactory ), I defined (define) an App\Student Model ,
And generate fake data through Faker , and store it in the field (below).
The sample below may be a bit more complex than the original Laravel preset, but basically once executed, a fake data will be created in the students data table,
Here I have an interesting way of using it. My c_index column needs to be added sequentially.
That is, when I create a hundred records, the c_index column must be added sequentially from 1 to 100, so I created a custom Class to handle this matter.
With Facetory, we can easily create single or multiple fake data through the instructions provided by Tinker (
php artisan tinker ).In the picture below (Tinker's interactive mode), through the factory , I created 10 random fake data, and put them in the students data table.
3. Seeder
The use of Seeder allows us to create fake data without manually executing tinker .
How to build a seeder, I think, you may have guessed it, of course it is
make:seeder (produce: sower).I think after reading this, you should already know
make:model and make:factory ,And use
php artisan tinker to create fake data.
php artisan make:seeder StudentShareSeeder
In the above command, I created a StudentSahreSeeder.php , after generating, use our editor to find the file,In the methods of run() in the figure below, add the factory instructions for creating fake data that I just used in Tinker,
For example, here, that is, when this run() is executed, 300 fake data can be created in one go.
We can use the
db:seed --class= command to execute the specified Seeder,For example, the StudentShareSeeder here can generate 300 pieces of fake information,
How can a new website be set up without fake information, right?
php artisan db:seed --class=StudentShareSeeder
When --class is not specified, php artisan db:seed defaults to calling DatabaseSeeder.php .Note: The seeder can not only be used to generate fake data, but also can be used to generate the real data initially required by a project.
4. Database Seeder
To quickly establish an operational development environment, of course, you don't need to manually issue so many instructions, you should just use
db:seed .When --class is not specified, DatabaseSeeder is used by default.
In the DatabaseSeeder.php in the figure below, you can see that I called a bunch of Seeders.
So for a reusable Project, I will execute migration and then execute
db:seed ,To generate the basic data required by the background.
Example: The background of my layout has fixed addition, modification and deletion functions and a modular form, so it is not necessary to build a website to rewrite the addition, modification and deletion once.
When I want to set up a new website, I just need to git clone the Project in the background.
Then execute
composer install , adjust .env (website domain name, OAuth host designation) and build database, and then execute php artisan migrate and php artisan db:see d , and I can log in to the background to set the required form Style and other functions, and generate fake data,Then, according to the static page given to me by the artist, the front-end of the blade was set, so the background of the set can be reused.
Through
db:seed , I can quickly establish the basic environment for the entire background operation.
php artisan db:seed
After the above command is executed, it will run DatabaseSeeder , which will instantly generate well-defined test data that I need for development.So with
db:seed , it is very convenient to use it to create the shared data initially required by the Project, whether it is for personal use or for others.In the example above, my OwBaseSeeder is not running the factory , but Laravel 's Query Builder .
Take a look at my OwBaseSeeder.php here how to run Insert basic information.
Five, help (help)
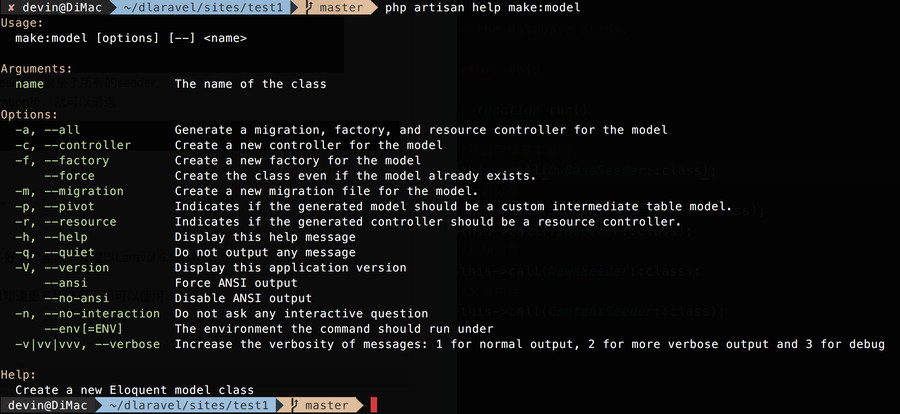
Let's go back to Model. The make:model command has many useful parameters. Here we take Laravel 5.5 as an example.
-a or -m etc.
If we don't know much about Laravel's artisan command, if we want to know more, we can use the help keyword to get instructions.
php artisan help make:model For example, while building the Model, other required files, such as Factory, Controller, and migration files, will be generated together.
Below, the diagram:


No Comment
Post your comment