Published - 8 years ago ( Updated - 8 years ago )
Do you want to build a continuous integration and delivery CI Server for Laravel through docker?
Execute laravel dusk and phpunit on CI Server to easily handle automated testing and related records.
After reading this article, you may find out how simple CI/CD is.
I mean basic use.
If you are not very familiar with the terms continuous integration or continuous delivery,
You can refer to the link below, I will not explain more.
Sam Pot's definition of continuous integration, continuous deployment, and continuous delivery
DevinY/jenkins detailed instructions on GitHub:
https://github.com/DevinY/jenkins
(Note: The PHP in this jenkins usesPHP 7.1.10 , and the installed package is the same as the PHP 7.1.x version on D-Laravel )
PHP has been updated to 7.2.6. (2018-06-10)
If you want to use it immediately, just execute the following instructions in sequence.
Of course, your computer needs to have Docker and git basics.
( I’m sure it’s executable on MacOS, you may need to know some docker settings and permission adjustments to run on Linux ).
Please make sure your host port is not occupied 8080, 50000, 1915.
Please start
First remove the #build . annotation in docker- compose.yml (the # font size in front of build in the figure below),
Then execute
Alternatively, you can use the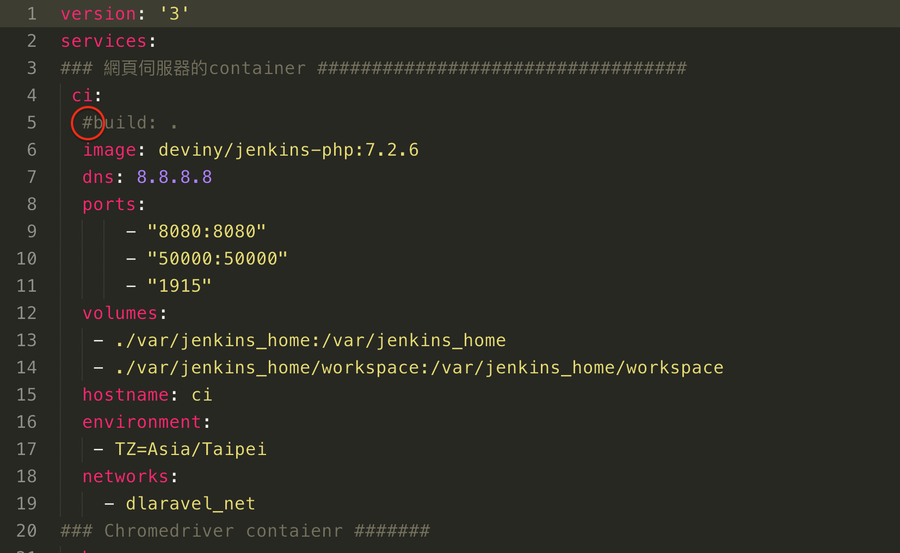
Having said too much, it is not difficult for those who understand the use of docker, so let’s get back to the topic,
When we have downloaded the jenkins repo, we can directly use the built image,
So just do
Docker will detect to see if the image specified in docker-compose.yml exists in our system,
If it does not exist, it will automatically download the image ( deviny/jenkins:7.1.10 ) that I built and pushed to Dockerhub ,
Directly download and use, that is to say, docker will use the image as a template to create and execute contaienr.
After the startup is complete, we can open the jenkins URL with a browser: http://localhost:8080.
For the first time, password unlocking is required. If it is executed in the background (using the -d parameter), please use
After unlocking, you can use the recommended installation. After completion, the screen will let us create a new user and enter Jenkins.
In addition, all jenkins installation data will be in the var folder in the jenkins folder.
According to the ci service setting in the docker-compose.yml file, the container will be mounted in the var/jenkins_home folder of the host,
In this way, the original environment can be maintained after the container is started.
Simply put, if the environment is damaged, or the password is forgotten, and we want to start over, we can cut off the var and execute
(All test builds will also be downloaded to var/jenkins_home/workspace).
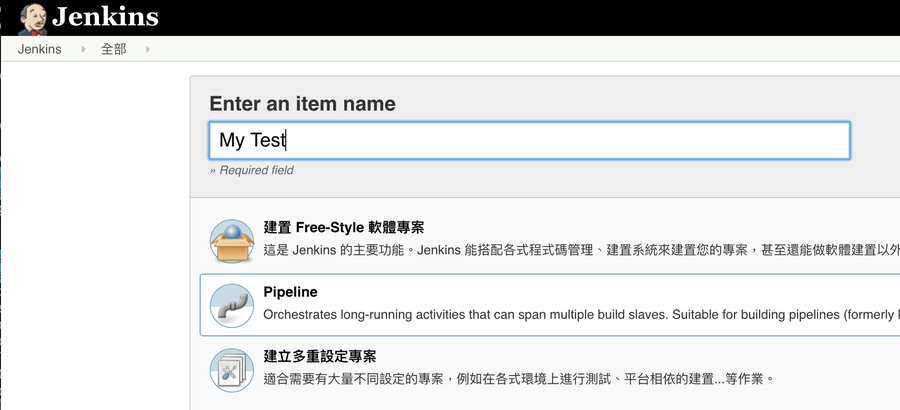
After logging in to Jenkins, we can select " Add Job ", and then select the pipeline to create a Jenkins job:
Below is the reference of the pipeline I use and the description of each stage:
download:
If we don't use the SCM round-robin method, but use the url trigger method,
You can use git to download the latest version of the code (see git in the black block below).
For example: Our CI Server does not have a real external IP, so maybe we can use round robin to let him catch it himself.
configuration:
It's very simple. I put the data and database settings used in the test environment into .env.example, so that it can be directly used by CI Server.
start up:
Here it is very simple to use the built-in development host of php to start Laravel
test:
Because of the Laravel framework, we want to make it easy for CI testing, so we just run it for him.
phpunit and php artisan dusk.
deploy:
If there are no problems, you can execute the deployment to the remote host.
For example, through rsync, use encryption to update the difference files,
No matter how large the Project is, it can basically be completed within a few seconds.
Or if the target environment is complex, call the remote Laravel's Envoy Task Runner for deployment.
This should be OK, how to deploy depends on the actual environment.
But I believe there are many ways to deploy, it depends on how you do it.

If you need database-related tests, no problem,
Because this Jenkins is also a docker container , so I will add the configuration file to the docker-compose.yml environment of D-Laravel ,
And to build jenkins on D-Laravel requires a working directory,
You can simply use D-Laravel to test the database design, so that the program in Jenkins can be connected to the db container,
Because the same network dlaravel_net is used,
So the CI service can easily ping to the db service (the default service name of D-Laravel's database container).
For example: the pipeline below is to perform migration:fresh and Insert related tests of fake data.
Those who know Laravel's migration or db:seed should laugh when they see the execution method of the pipeline below.
There are many places where the instructions are very familiar, and you should know what he is doing at a glance.
Because they are all the instructions executed by artisan on laravel, they are put on the pipeline for execution exactly,
For Laravel developers, the learning curve for such a setting should be zero.
The php artisan migrate:fresh in the following is a new function provided by Laravel 5.5,
Used to remove all tables and re-migrate.
Because it is a test database, every time it is executed, it will be a clean database, and then generate the required fake data .
The Laravel framework is a refreshing fu. If fu is a curse in English, I will change it to feel.
All in all, Laravel provides us with all kinds of functions, such as testing functions or the functions of establishing a test environment and creating fake data.

Have you found that in the Laravel environment, using CI's automatic testing is too simple,
It's so simple that I think this title should be labeled as an introduction rather than a teaching.
Well, for the sake of SEO, I'd better label it as teaching..
Execute laravel dusk and phpunit on CI Server to easily handle automated testing and related records.
After reading this article, you may find out how simple CI/CD is.
I mean basic use.
If you are not very familiar with the terms continuous integration or continuous delivery,
You can refer to the link below, I will not explain more.
Sam Pot's definition of continuous integration, continuous deployment, and continuous delivery
DevinY/jenkins detailed instructions on GitHub:
https://github.com/DevinY/jenkins
(Note: The PHP in this jenkins uses
PHP has been updated to 7.2.6. (2018-06-10)
If you want to use it immediately, just execute the following instructions in sequence.
Of course, your computer needs to have Docker and git basics.
( I’m sure it’s executable on MacOS, you may need to know some docker settings and permission adjustments to run on Linux ).
Please make sure your host port is not occupied 8080, 50000, 1915.
git clone https://github.com/DevinY/jenkins
cd jenkins
docker-compose up
Off topic, if you want to build your own jenkins image,Please start
docker-compose up before,First remove the #build . annotation in docker- compose.yml (the # font size in front of build in the figure below),
Then execute
docker-compose up , so that when docker finds that you have not downloaded the image , it will automatically use the Dockerfile in the directory to create the jenkins image .Alternatively, you can use the
docker build command to build your own jenkins image first.
docker build -t myjenkins . Remember to adjust the image name used in your docker-compose.yml , for example: change to myjenkins .
The Jenkins image is very large, and it will take some time to complete the build if you try to build the image yourself.
Having said too much, it is not difficult for those who understand the use of docker, so let’s get back to the topic,
When we have downloaded the jenkins repo, we can directly use the built image,
So just do
docker-compose up -d .Docker will detect to see if the image specified in docker-compose.yml exists in our system,
If it does not exist, it will automatically download the image ( deviny/jenkins:7.1.10 ) that I built and pushed to Dockerhub ,
Directly download and use, that is to say, docker will use the image as a template to create and execute contaienr.
After the startup is complete, we can open the jenkins URL with a browser: http://localhost:8080.
For the first time, password unlocking is required. If it is executed in the background (using the -d parameter), please use
docker-compose logs ci to view the unlocked password.After unlocking, you can use the recommended installation. After completion, the screen will let us create a new user and enter Jenkins.
In addition, all jenkins installation data will be in the var folder in the jenkins folder.
docker-compose down or ctrl+c is interrupted, the container will be removed.According to the ci service setting in the docker-compose.yml file, the container will be mounted in the var/jenkins_home folder of the host,
In this way, the original environment can be maintained after the container is started.
Simply put, if the environment is damaged, or the password is forgotten, and we want to start over, we can cut off the var and execute
docker-compose up again.(All test builds will also be downloaded to var/jenkins_home/workspace).
After logging in to Jenkins, we can select " Add Job ", and then select the pipeline to create a Jenkins job:
Below is the reference of the pipeline I use and the description of each stage:
download:
If we don't use the SCM round-robin method, but use the url trigger method,
You can use git to download the latest version of the code (see git in the black block below).
For example: Our CI Server does not have a real external IP, so maybe we can use round robin to let him catch it himself.
configuration:
It's very simple. I put the data and database settings used in the test environment into .env.example, so that it can be directly used by CI Server.
start up:
Here it is very simple to use the built-in development host of php to start Laravel
test:
Because of the Laravel framework, we want to make it easy for CI testing, so we just run it for him.
phpunit and php artisan dusk.
deploy:
If there are no problems, you can execute the deployment to the remote host.
For example, through rsync, use encryption to update the difference files,
No matter how large the Project is, it can basically be completed within a few seconds.
Or if the target environment is complex, call the remote Laravel's Envoy Task Runner for deployment.
This should be OK, how to deploy depends on the actual environment.
But I believe there are many ways to deploy, it depends on how you do it.
pipeline {
agent any

stages {
stage('download') {
steps {
git 'https://github.com/DevinY/test1.git'
}
}
stage('configuration') {
steps {
sh 'cp.env.example.env'
sh 'composer install'
sh 'php artisan key:generate'
}
}
stage('start'){
steps {
sh 'php artisan serve&'
sh 'php artisan view:clear'
}
}
stage('phpunit test'){
steps {
sh 'vendor/bin/phpunit'
}
}
stage('dusk test'){
steps {
sh 'php artisan dusk'
}
}
stage('deployment') {
steps {
sh 'echo can execute rsync'
}
}
}
}
The following figure shows the construction screen of the actual execution of the pipeline above:If you need database-related tests, no problem,
Because this Jenkins is also a docker container , so I will add the configuration file to the docker-compose.yml environment of D-Laravel ,
And to build jenkins on D-Laravel requires a working directory,
You can simply use D-Laravel to test the database design, so that the program in Jenkins can be connected to the db container,
Because the same network dlaravel_net is used,
So the CI service can easily ping to the db service (the default service name of D-Laravel's database container).
### 網頁伺服器的container ##################################
ci:
#build: .
image: deviny/jenkins-php:7.1.10
dns: 8.8.8.8
ports:
- "8081:8080"
- "50001:50000"
- "1915"
volumes:
- ./var/jenkins_home:/var/jenkins_home
- /var/run/docker.sock:/var/run/docker.sock
- /usr/local/bin/docker:/usr/bin/docker
hostname: ci
environment:
-TZ=Asia/Taipei
networks:
- dlaravel_net

### Chromedriver container #######
chrome:
image: robcherry/docker-chromedriver
network_mode: "service:ci"
environment:
CHROMEDRIVER_WHITELISTED_IPS: ""
CHROMEDRIVER_PORT: "9515"
cap_add:
- "SYS_ADMIN"
For example: the pipeline below is to perform migration:fresh and Insert related tests of fake data.
Those who know Laravel's migration or db:seed should laugh when they see the execution method of the pipeline below.
There are many places where the instructions are very familiar, and you should know what he is doing at a glance.
Because they are all the instructions executed by artisan on laravel, they are put on the pipeline for execution exactly,
For Laravel developers, the learning curve for such a setting should be zero.
The php artisan migrate:fresh in the following is a new function provided by Laravel 5.5,
Used to remove all tables and re-migrate.
Because it is a test database, every time it is executed, it will be a clean database, and then generate the required fake data .
The Laravel framework is a refreshing fu. If fu is a curse in English, I will change it to feel.
All in all, Laravel provides us with all kinds of functions, such as testing functions or the functions of establishing a test environment and creating fake data.
pipeline {
agent any

stages {
stage('download') {
steps {
git 'https://github.com/DevinY/test1.git'
}
}
stage('configuration') {
steps {
sh 'cp.env.example.env'
// sh 'sed -i "s/localhost/localhost:8000/".env'
sh 'composer install'
sh 'php artisan key:generate'
}
}
stage('start'){
steps {
sh 'php artisan serve&'
sh 'php artisan view:clear'
}
}
stage('test migration'){
steps {
sh 'php artisan migrate:fresh'
sh 'php artisan'
}
}
stage('test database seeder'){
steps {
sh 'php artisan db:seed'
}
}
}
}
Any failures will be recorded.Have you found that in the Laravel environment, using CI's automatic testing is too simple,
It's so simple that I think this title should be labeled as an introduction rather than a teaching.
Well, for the sake of SEO, I'd better label it as teaching..


No Comment
Post your comment